The following steps walk through an example use case and the information that will need to be saved will be specific to your application.
NOTE: Steps 1-23 can be completed with base ‘Admin’ permissions. Step 24 and on (managing domain-wide delegations) require ‘SuperAdmin’ permissions. We recommend coordinating with SuperAdmin permission holder before attempting all configuration steps.
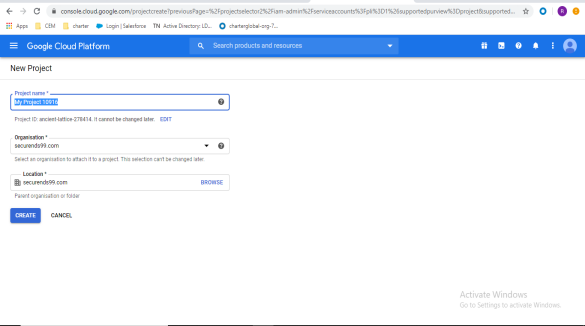
Create Project
Step 1:
- Click on below URL.
https://console.developers.google.com/iam-admin/serviceaccounts
Step 2:
- Click Create Project and enter details, click on CREATE.
- Project name = custom project name
- Organization = choose the corresponding G-Suite domain for your organization
- Location = choose the parent organization or folder
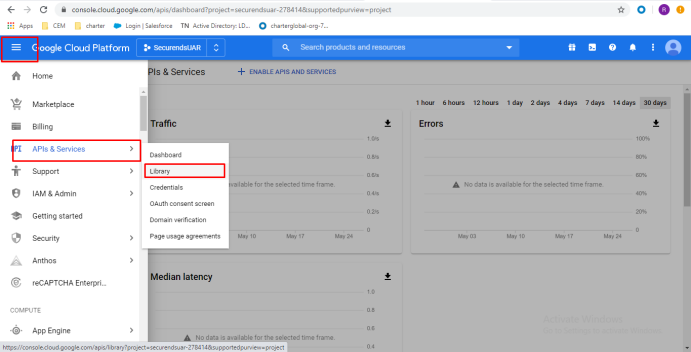
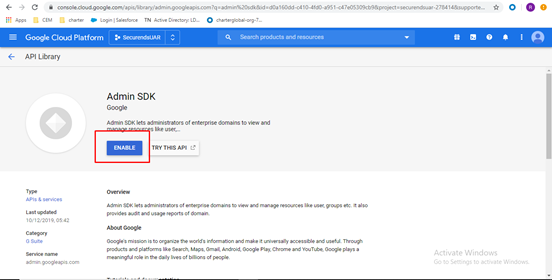
Enable Admin SDK
Step 3:
- Navigate to APIs & Services and select Library.
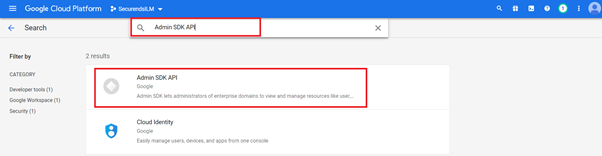
Step 4:
- Search Admin SDK and click on Admin SDK in results.
Step 5:
- Click on Enable.
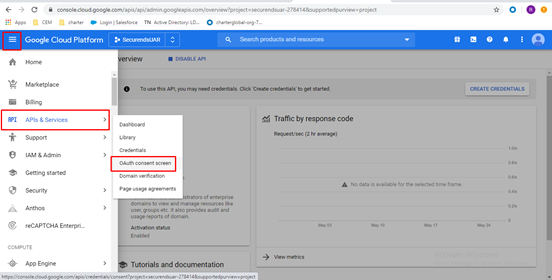
Configure OAuth Consent Screen
Step 6:
- Navigate to APIs & Services and select OAuth consent screen.
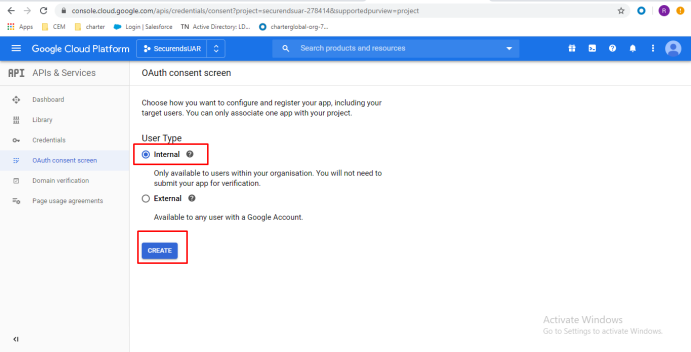
Step 7:
- Select Internal and click on Create.
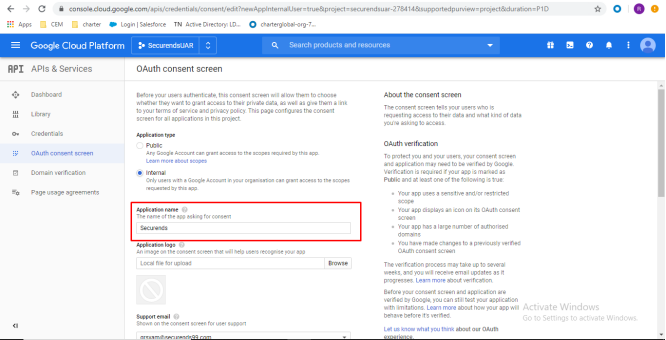
Step 8:
- Enter a custom Application name (This Application name will be used in the SecurEnds application when configuring the G Suite Connector)
- As an example: applicationName = Securends
- Store/copy down the application name you created for later use. This application name is case sensitive
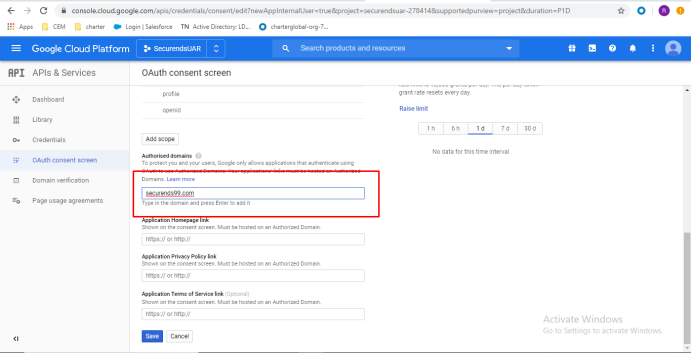
Step 9:
- Enter “Authorized domains” domain used during Step 2 when creating the project and click on save (This domain will be used in the SecurEnds application when configuring the G Suite Connector)
- Example used below : domain = securends99.com
- This would be your organizations G-Suite domain, not your SecurEnds domain.
- Example used below : domain = securends99.com
- Store/copy down the domain for later use.
Create Service Account
Step 10:
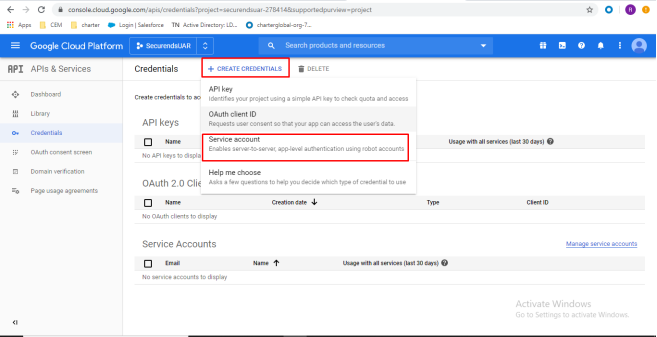
- Click on Credentials from left pane.
Step 11:
- Navigate to Create Credentials and select Service account.
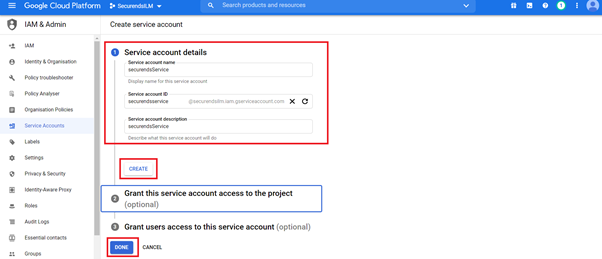
Step 12:
- Enter custom service account details and click on Create.
- As an example: Service account name = securendsService
Grant this service account access to the project and Grant users access to this service account are optional can be skipped.
Step 13:
- Click on Done for Service account permissions (Step 2).
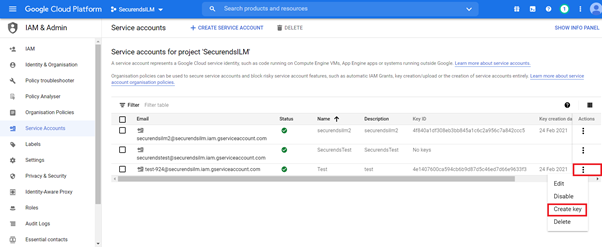
Step 14:
- Select the Service account for which you need to create key.
- Click on Actions and select Create key
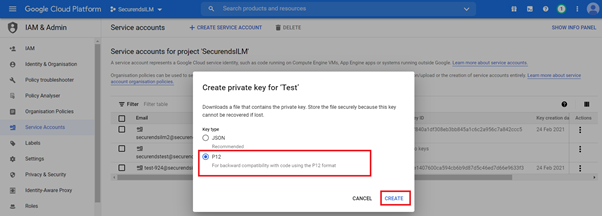
Step 15:
- Select P12 and click on Create.
Step 16:
- A p12 file will be downloaded and make a note and save private key password, then click on Close.
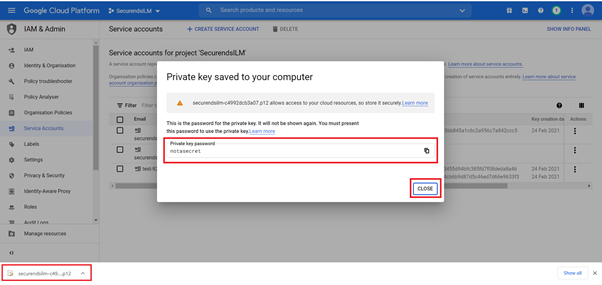
- The downloaded p12 file has to be placed in /var/ssl in AWS Cloud instance.
- Provide the path has below in env_file
- GSUITE_PKFILE_PATH=/var/ssl/XXXXX.p12
- Upload the generated certificate to /opt/docker/XXXX/ssl
- Restart the SecurEnds CEM application.
Domain Wide Delegation
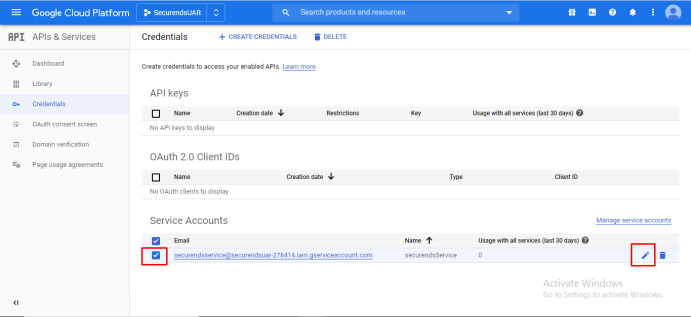
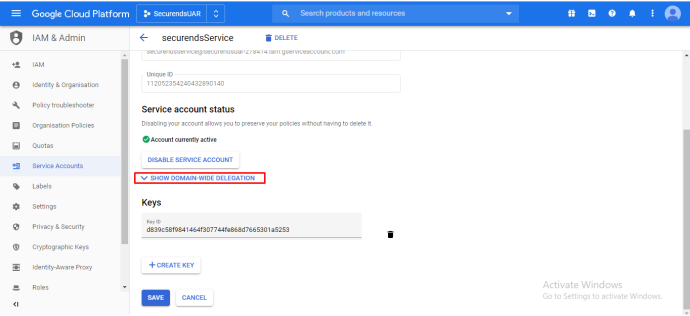
Step 17:
- Select the service account created and click on Edit.
Step 18:
- Click on SHOW DOMAIN WIDE DELEGATION
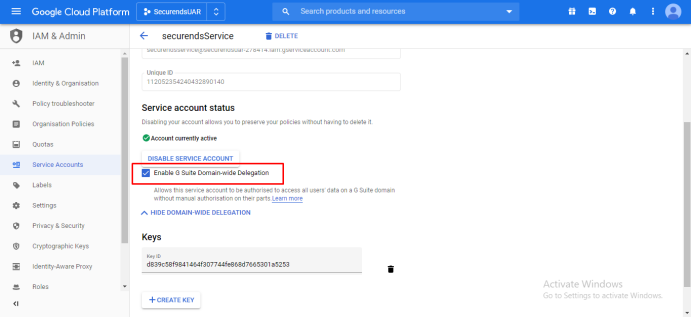
Step 19:
- Select the checkbox Enable G Suite Domain wide Delegation
- Click on Save.
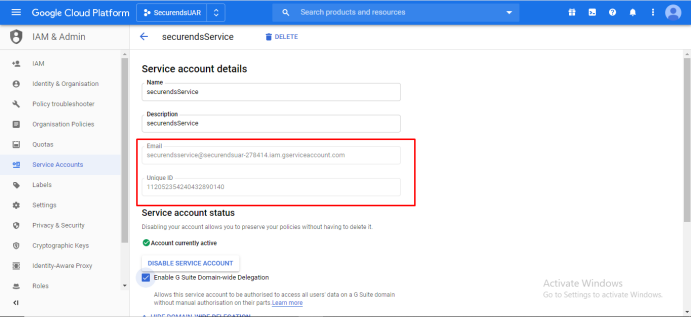
Step 20:
- Please make a copy of the email and unique id and click on Save. (This unique id will be used in the SecurEnds application when configuring the G Suite Connector)
- As an example: serviceAccountId = securends0912@securendsuar-278414.iam.gserviceaccount.com
- Store/copy down the serviceAccountId for later use.
Enable Scopes for Service Account
Step 21:
- Now click on the below URL and login with admin credentials.
https://admin.google.com/
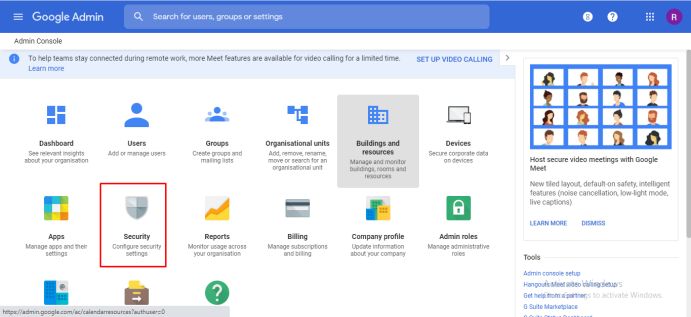
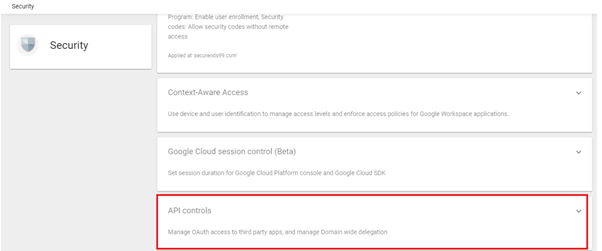
Step 22:
- Click on Security settings.
Step 23:
- Click on API Controls by scrolling down.
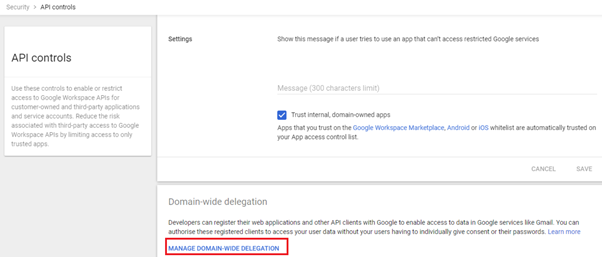
Step 24:
- *SuperAdmin permission required here*
- Click on Manage Domain-Wide delegation by scrolling down.
Step 25:
- Click on Add New behind the API Clients.
- Enter the unique ID (From step 20) under client ID and below OAuth scopes under API scopes with comma(,) delimited, then click on Authorise.
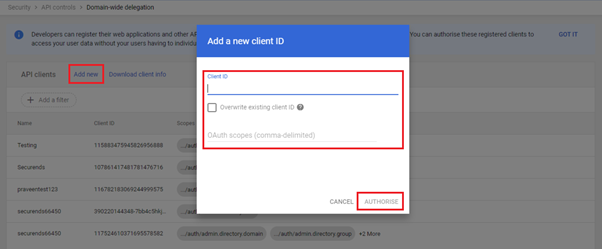
- https://www.googleapis.com/auth/admin.directory.domain
- https://www.googleapis.com/auth/admin.directory.group
- https://www.googleapis.com/auth/admin.directory.rolemanagement
- https://www.googleapis.com/auth/admin.directory.user
Step 26:
- When utilizing the service account set up steps above, Google can recognize the current customer when my_customer is used as the customerId (customerId = my_customer or G Suite Customer ID)
- As an example: customerId = my_customer
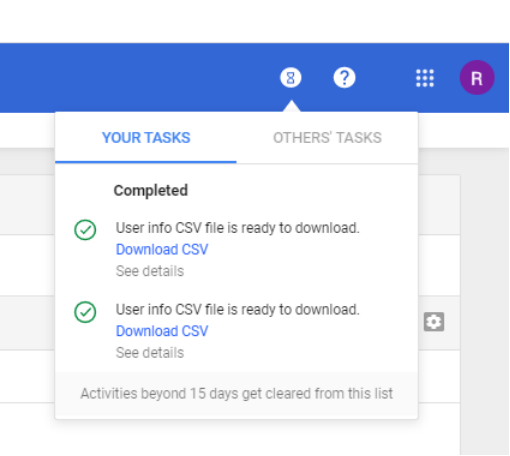
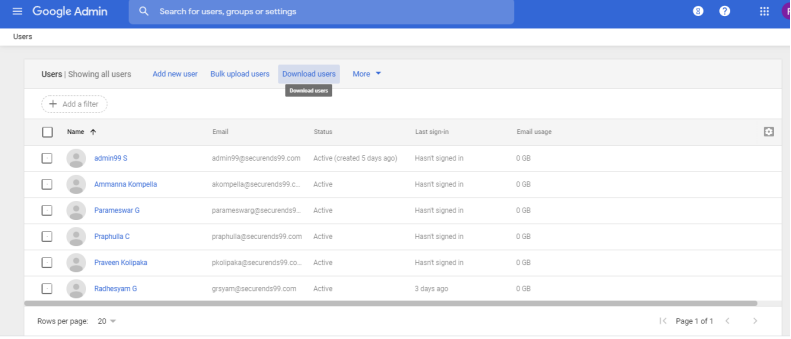
Downloading a CSV File
- The instructions below will walk you through the steps needed to download a CSV file to upload into SecurEnds if an automatic connector is not established.
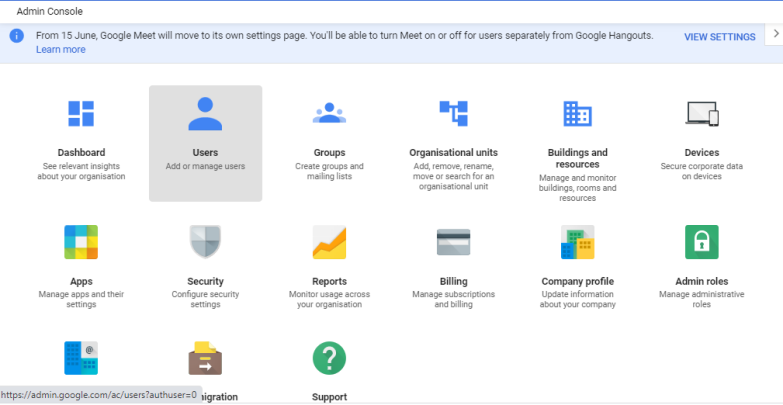
- Login to admn.google.com
- Select Users from the dashboard.
- Select Download users.
- Select All user info columns and currently selected columns and Comma-separated values (.csv):
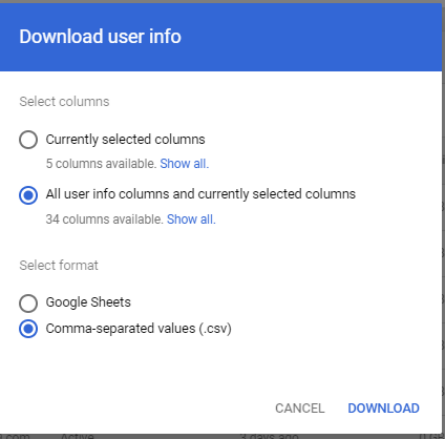
- Under YOUR TASKS in the top right of the window, select Download CSV to download the file to upload into SecurEnds in replacement of making an automatic connector