Configuration Requirements
- Customer will need to have the SFTP folder available on their side.
- Customer needs to provide a User ID and Password so SecurEnds can configure the tool.
- Customer will need to go into the SecurEnds tool and update the SFTP credentials if the customer have a security policy which requires password rotation every X days.
- Customer will need to maintain a static file name for the file placed in the SFTP folder.
App Creation in SecurEnds Tool
- In the Admin Console, go to Applications.
- Click the Add button next to it to begin configuration.

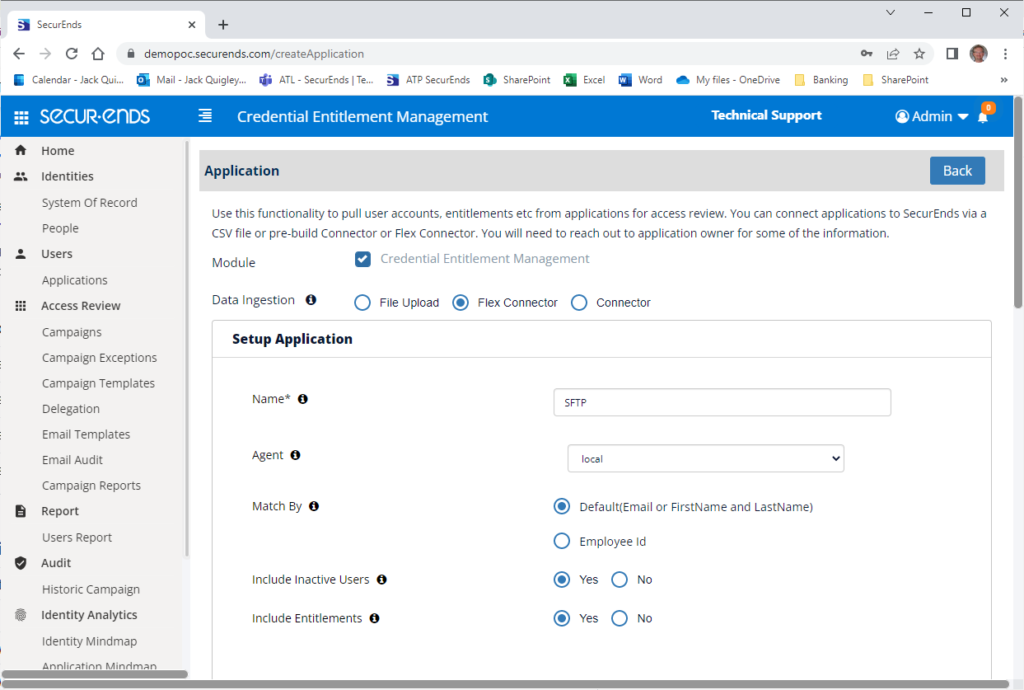
Setup Application
- Select Data Ingestion method as Flex Connector.
- Enter application Name.
- Agent will be local
- Select Match By logic as Default(Email or FirstName and LastName) or Employee Id
- If we select Default(Email or FirstName and LastName) the system will match the user with Email or First Name and Last Name while syncing
- If we select Employee Id the system will only match the Employee ID while syncing
- Select Include Inactive Users to fetch all users while sync. Your application CSV being placed on the SFTP should include a status of the credential within the application. If the file does not contain a status, leave as Yes.
- When selecting Yes, all empty, Active and Inactive/Disabled credentials statuses will be ingested.
- When selecting No, then only empty and Active credentials will be ingested.
- Include Entitlements Enabled as Yes to load the entitlements on application while syncing.

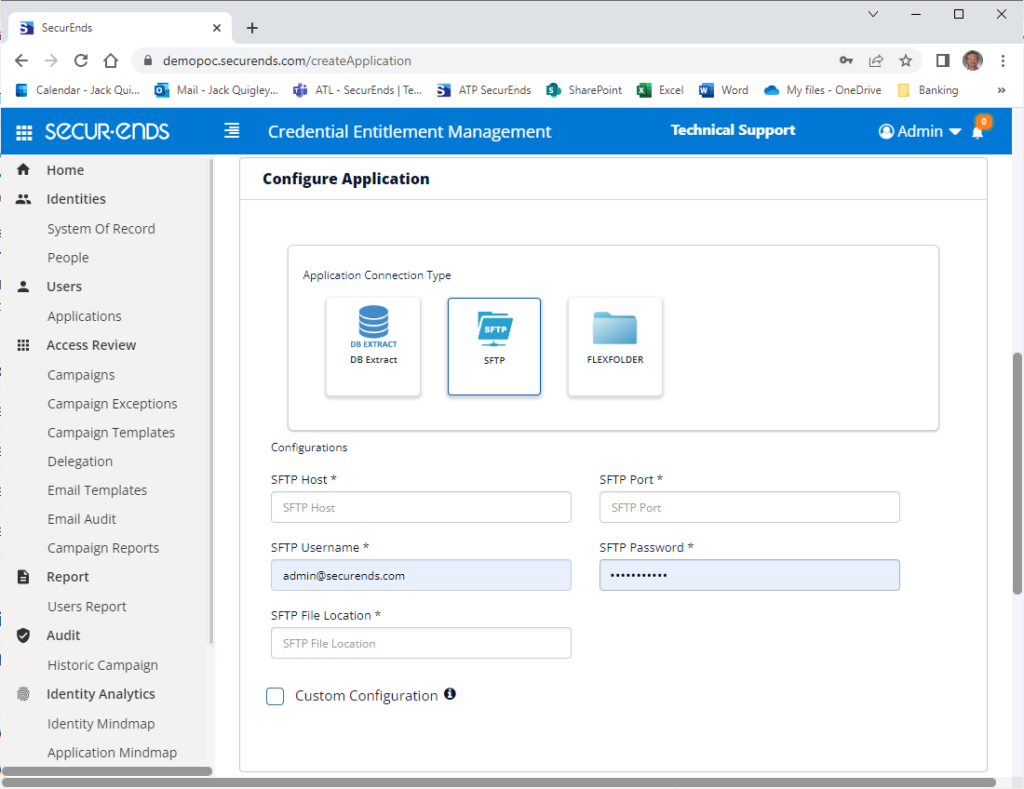
Configure Application
- Search Connector in Featured Integrations and select SFTP.
- Provide the “SFTP Host” to login into the domain
- Example: sftp.securends.com
- Provide the “SFTP Port”
- Example: 22
- Provide the “SFTP Username” to login into the domain
- Example: test-user
- Provide the “SFTP Password”
- Example: Password
- Provide the “SFTP File Location”
- Format: /filename.filetype or /inbound/filename.filetype
- Example:
- /SCM_SE_01_20190101.csv
- /inbound/SCM_SE_01_20190101.csv
- Example:
- Format: /filename.filetype or /inbound/filename.filetype
- Note: Please use the SecurEnds provided SFTP Sample file, the headers should be same as the provided file with case sensitive.
- If needed, select “Custom Configuration” to manually map the SFTP file headers to the SecurEnds headers.

CSV Files
There are 2 format options for the CSV file that you place on the SFTP server.
- Your CSV must contain specific column names so SecurEnds can recognize the data. You can view each column header name in the image below.
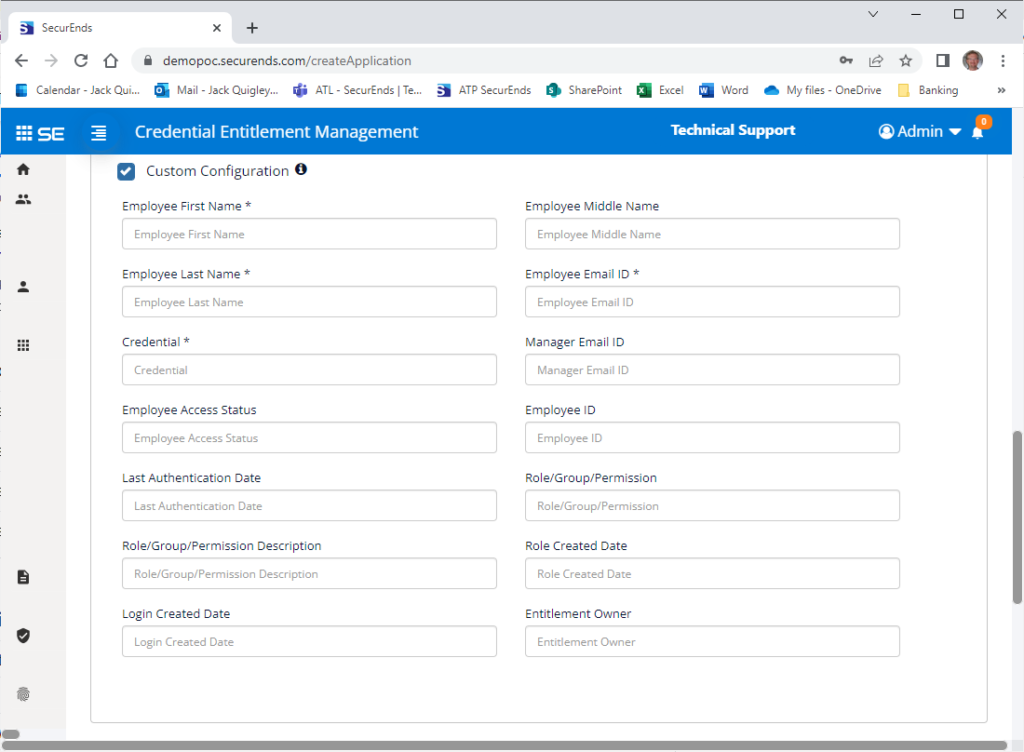
- You can use the Custom Configuration option to map the column headers in your CSV file to SecurEnds attributes. When selecting Custom Configuration, the UI will expand per the below

Exporting Application Data Ingested using SFTP
When you export the application data (Gear icon->More->Export), SecurEnds will export the data to a CSV format and will have mapped the data to SecurEnds attributes. Below are the mapping details
- Employee First Name – First Name
- Employee Middle Name – Middle Name
- Employee Last Name – Last Name
- Employee Email ID – Email
- Credential – Distinguished Name (Common Name will be a copy of Distinguished Name data)
- Manager Email ID – SOR Manager Email
- Employee Access Status – Access Status
- Employee ID – User Id
- Last Authentication Date – Last Authentication
- Role/Group/Permission – Entitlement DN (Entitlement CN will be a copy of Entitlement DN data)
- Role/Group/Permission Description – Entitlement Description
- Role Created Date – Entitlement Created Date
- Login Created Date – Credential Created Date
Note: If there are Purged Credentials or Purged entitlements as a result of the most recent sync of the application. Those are still present in the exported CSV data and will be denoted by a P within the Status and Entitlement Status attributes. You will want to exclude these from the CSV if you are just looking at data synced by from the applications. Status codes of E (Excluded) and D (Deleted) are valid records from your application, the SecurEnds Admin has simply chosen to classify these records respectively through an earlier action.
Ticketing System Configuration
For more information on Ticketing System Configuration, Click here.
Click Save once finished to add the connector.