Pre-requisite
- If the Database (DB) is on -prem, we install a Generic Agent (GA) and as best practice make sure the connectivity between the GA and DB must is in active status so that the data is being pulled into SecurEnds in the right manner.
- Link to Generic Agent installation: https://www.securends.com/documentation/installing-securends-agent/
App Creation in SecurEnds Tool
- Log into the SecurEnds application as the Admin. Go to Applications
- Click the Add button next to it to begin configuration.

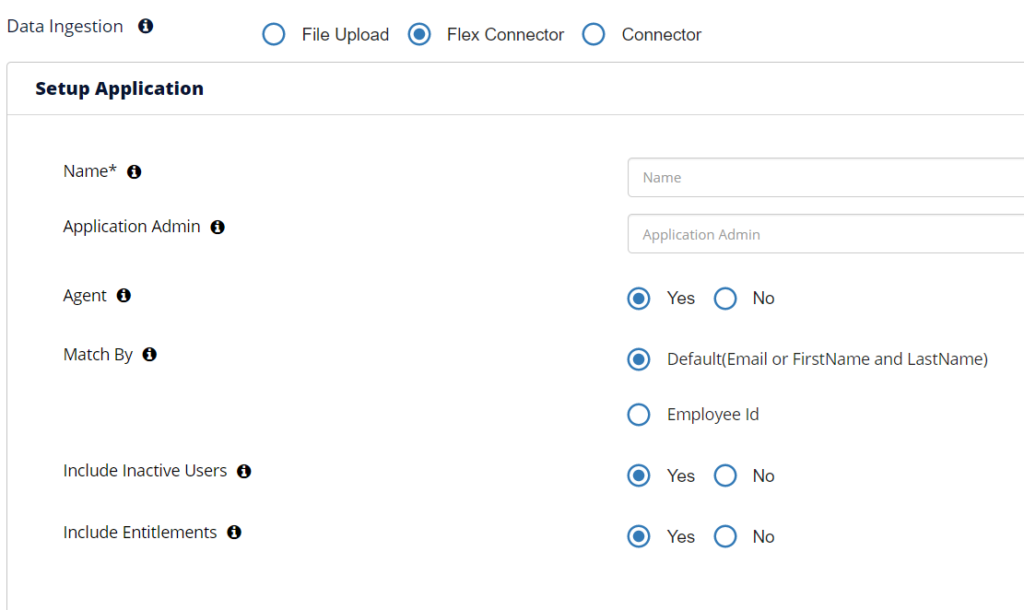
Setup Application
- Select Data Ingestion method (radio button) for Flex Connector
- Provide an application Name
- Select an Agent option. The Agent is software is required to be installed on the clients on premise environment in order to pull data from applications such as Active Directory, Databases and Custom Applications.
- Select Remote if you have an Agent Software already installed
- The server where the agent is installed needs to have connectivity to the database.
- If an agent is required, contact your implementation consultant or submit a ticket via the SecurEnds Help Desk using the Report Issue link in the upper right corner of the application.
- Select Local if the client has a SaaS database. No agent install is required.
- You will need to whitelist the SecurEnds IP’s. Your Implementation Consultant can provide these.
- Select Remote if you have an Agent Software already installed
- Select Match By logic as Default(Email or FirstName and LastName) or EmployeeId
- Default(Email or FirstName and LastName)
- The system will match the user using an Email Address available from the application; OR by First Name and Last Name when a sync is performed. This OR for the matching is done for each row. For example, if an email address is present, that will be used to match the user to an email address found in the System of Record. If the email address is not present, then the first and last name will be used to match the user to a correct identity from the System of Record.
- Employee Id
- The system will only match the Employee ID while syncing. This “ID” for the user in the application must be present within the System of Record data in order to be matched. First name, last name or email address is no longer a required data point.
- Default(Email or FirstName and LastName)
- Select Include Inactive Users to fetch all users while sync
- Yes
- All the Active status users along with all Inactive/Disabled status users within the application data will attempted to be matched to an identity within the System of Record and if a match is found, these users will be included in any campaigns against this application.
- No
- Only Active status user users within the application data will attempted to be matched to an identity within the System of Record and if a match is found, these users will be included in any campaigns for against the application.
- Yes
- Include Entitlements
- Yes
- Will load the entitlement data from the application data when synced.
- No
- Use if the client only want the user credentials from this application data (for credential access reviews).
- Yes
Configure Application
- Select/highlight the Application Connection Type as DB Extract

SQL Server
For SQL server connection configuration, select SQL Server checkbox.
To connect to a SQL Server, we support 2 authentication modes.
SQL server Authentication – is similar to connecting to other DB types. Windows Authentication – select this option in the dropdown and additionally provide the domain name.
- Provide the details below to connect with Applications using Flex connector
- DB UserName to login into the domain.
- Windows authentication is not supported. The service account must be created on the database server.
- For example: SecurEndsUser
- Provide the DB Password
- For example: dkjsde7y7hu3#%
- Provide the DB Url
- MySQL example: jdbc:mysql://ipaddress:port/
- MySQL example: jdbc:mysql://hostname:port/DBNAME
- SQL Server example: jdbc:sqlserver://hostname:port;DatabaseName=DBNAME
- SQL Server example: jdbc:sqlserver://ipaddress:port
- AS400 example: jdbc:as400://ipaddress:port;DatabaseName=DBNAME
- Oracle example: jdbc:oracle:thin:@hostname:port/DBNAME
- Oracle example: jdbc:oracle:thin:@ipaddress:port:DBNAME
- DB2 example: jdbc:db2://hostname:port/DBNAME
- DB2 example: jdbcdb2://ipaddress:port/DBNAME
- Postgres example: jdbc.postgresql://hostname:port/DBNAME
- DB UserName to login into the domain.
SELECT
[app credential] as commonNameColumn (this should be the userID/loginID/email - not Name),
[app credential] as distinguishedNameColumn (copy of commonNameColumn),
[user first name] as firstNameColumn,
[user last name] as lastNameColumn,
[user middle name or initial] as middleNameColumn (optional),
[user email address] as emailColumn,
[manager app credential] as managerColumn (optional),
[entitlement/permission/role] as entitlementDNColumn,
[entitlement/permission/role] as entitlementCNColumn (copy of entitlementDNColumn),
[description of the entitlement/permission/role] as entitlementDescriptionColumn (optional),
[user app status] as accessStatusColumn (i.e., Active, Inactive or Terminated - this value will be seen in reviews),
[user last login date] as lastAuthenticationColumn (optional),
[user employee ID] as userid (optional),
[application reviewer email address or employee ID] as managerColumn (optional unless used as SOR),
[department of user] as department (optional),
[Employee Title or Job title] as [Employee Title] (optional),
[keep including other attributes that you may want to filter on for a campaign]
FROM [name of client table or SQL view]
When you export the application data (Gear icon->More->Export), SecurEnds will export the data to a CSV format and will have mapped the data to SecurEnds attributes. Below is the mapping detail
- Employee First Name – First Name
- Employee Middle Name – Middle Name
- Employee Last Name – Last Name
- Employee Email ID – Email
- Credential – Distinguished Name (Common Name will be a copy of Distinguished Name data)
- Manager Email ID – SOR Manager Email
- Employee Access Status – Access Status
- Employee ID – User Id
- Last Authentication Date – Last Authentication
- Role/Group/Permission – Entitlement DN (Entitlement CN will be a copy of Entitlement DN data)
- Role/Group/Permission Description – Entitlement Description
- Role Created Date – Entitlement Created Date
- Login Created Date – Credential Created Date
Note: If there are Purged Credentials or Purged entitlements as a result of the most recent sync of teh application. Those are still present in the exported CSV data and will be denoted by a P within the Status and Entitlement Status attributes. You will want to exclude these from the CSV if you are just looking at data synced by from the applications. Status codes of E (Excluded) and D (Deleted) are valid records from your application, the SecurEnds Admin has simply chosen to classify these records respectively through an earlier action.
Ticketing System Configuration
For more information on Ticketing System Configuration, Click here.
Click Save once finished to add the connector.


